Nightly Builds with Sourceforge and Drone (Part 1)

This post lays the groundwork for some future tutorials on the topics of continuous integration, cross compilation and binary deployment. I will discuss each topic in greater detail but first give a high level overview about the scenario, the goal and how it is pursued. Some parameters of the scenario are very specific (e.g. using Sourceforge, Drone, and Mercurial), others may be adaptable to completely different problems.

In case the title seems too vague, here is a look at the original (more precise) title:
Providing Nightly Builds of Windows Binaries though Cross Compilation on Ubuntu for Open Source Projects hosted on SourceForge using the Drone Coninuous Integration Service through a Proxy Project on BitBucket.

Scenario

  1. Our existing project ci-test is hosted on Sourceforge.
  2. ci-test uses Mercurial for revision control and gets new commits pushed every few days.
  3. ci-test depends only on cross platform libraries.
  4. ci-test is open source.
A word about SourceForge

Before we start: in my opinion SF is pretty much obsolete for new open source projects. DVCSs have taken over the OSS world in recent years and are not going away anytime soon. SF was too late to offer them as alternatives to their tool of choice Subversion. Even now, SF’s integration of Git and Mercurial is laughable. SF does not support most cool features hosting providers such as GitHub and BitBucket introduced in the last years. On top of that, it is usually not supported by services (most notably continuous integration) building on top of modern hosters.

Having said that, SF still has a few important points in its favor: it offers users shell access to their account and their repositories. And it tolerates uploading large binary files for distribution, a use case that other services still struggle with. This tutorial will make use of both of these features.

So, why SF? For the ease of argument, let us assume we are dealing with an existing project (you would not host a new project on SF, would ya?), and that migrating is not an option. In case the project is hosted on GitHub or BitBucket, some of the hurdles go away (e.g. proxy project). However, we would still use SF for deployment of binary artifacts.

Goal

  1. A build artifact should be created for new commits pushed to the SF repository.
  2. The artifact should contain the project’s binary for Windows.
  3. The artifact should appear in the Files section on the SF project page.
  4. We only want artifacts for the default branch (or master branch in git).
  5. We do not want to spend money.

So the goal is to provide nightly builds for our project and make them publicly available. The thing about providing Windows binaries is to incorporate the cross compilation step into our journey. Since the continuous integration service builds on Linux, this is another challenge. Also, I have not yet come accross a free build service running Windows. Providing binaries for Linux would be much easier (and a bit pointless).

Workflow

The development/distribution workflow we want looks like this:

  1. Developer A pushes new commits to the default branch.
  2. Developer A gets an email containing a link.
    2.1 If A clicks the link, a nightly build is triggered and an new artifact appears a few minutes later.
    2.2 If A ignores the email, nothing happens.

This approach is mostly automated but still gives the developer the choice not to provide a build artifact for his latest updates. I think this is a reasonable workflow for open source projects, whose default/master branch is not always as stable as it should be.

The following figure outlines the workflow and provides some more technical information about the actors and their relationships.

  1. The developer pushes to the repo.
  2. The developer receives an email with a link.
  3. The developer clicks the link and starts a build.
  4. The bash build script (running on Ubuntu 12.04) clones the repository from SF and sets up everything else it needs for building. It compiles the code and creates the artifacts (e.g. compress binary and config files into a single archive).
  5. The script then uploads the artifacts into the designated SF project section. Settings up the authentification is a key task for making the process work and will be covered later.

Setting things up

This section lists the major tasks to set up the workflow described. It serves as a high level tl;dr and should be enough for someone familiar with the technology and services involved. Everyone else will have to wait for the second part of this tutorial.

  • Create and account for BitBucket and Drone if you do not have one yet.
  • Create a proxy project on BitBucket, e.g. ci-test-nightly. SF itself is not supported by Drone, so the purpose of this proxy project is just to be able to create a new build project on Drone.
  • Login to Drone and create a ‘New Project’ based on ci-nightly from BitBucket.
  • Enter ‘default’ into the Settings -> Repository -> Branch Filter
  • Register the projects SSH key from Settings -> Repository -> View Key at your SF account.
  • Create a folder ‘NightlyBuilds’ inside the project’s files section via the SF shell.
  • Copy the Settings -> Repository -> Build Hook link and create a Mercurial hook via the SF shell to send out an email containing this link to developers.
  • Write the clone & build & upload script into the Settings -> Commands text box.

Notes & Risks

  • SourceForge took quite some time (hours) until the newly registered SSH key was accepted.
  • Drone is still in Beta and may change considerably in the future. This may lead to alterations to the service that renders these instructions useless.
  • Although I only talked about BitBucket and Drone, it should be possible to replace each of them with GitHub or Travic-CI. I have not done it, but do not see technical problems standing in the way.

Future

The next part(s) will go into cross compilation on the Drone applience and how to configure SF through shell access.

Reference

Comparison of continuous integration software
CIaaS roundup: 11 hosted continuous integration services
SourceForge: Release Files for Download (FRS)
SourceForge: Service quotas
SourceForge: Trust issues with Mercurial project-based hgrc
Drone Documentation
Drone CI - Philly DevOps May 2014
Fun With C++ Callbacks

I did some experiments with callbacks based on a snippet from ideone.com.

EventManagerBuild&Run
1
2
3
4
5
6
7
8
9
10
11
12
13
14
15
16
17
18
19
20
21
22
23
24
25
26
27
28
29
30
31
32
33
34
35
36
37
38
39
40
41
42
43
44
45
46
47
48
49
50
51
52
53
54
55
56
57
58
59
60
61
62
63
64
65
66
67
68
69
70
71
72
73
74
75
76
77
78
79
80
81
82
83
84
85
86
87
88
89
90
91
92
93
94
95
96
97
98
99
100
#include <iostream>
#include <vector>
#include <string>
#include <memory>
#include <algorithm>
#include <functional>

class EventManager
{
public:
    template<class F>
    void AddClient(F client)
    {
        clients.emplace_back(new EventClient<F>(std::move(client)));
    }
    
    void Emit()
    {
        std::for_each(clients.begin(), clients.end(), [](auto& client){ client->Respond(); });
    }
    
private:
    struct IEventClient
    {
        virtual ~IEventClient() { }
        virtual void Respond() = 0;
    };
    
    template<class F>
    struct EventClient : IEventClient
    {
        F f;
        EventClient(F&& f) : f(std::move(f)) { }
        void Respond() override { f(); }
    };
    
    std::vector<std::unique_ptr<IEventClient>> clients;
};

struct Foo { void operator()() const { std::cout << "Foo\n"; } };

struct Bar { int operator()() { std::cout << "Bar\n"; return 0; } };

struct Baz
{
    Baz() { id = ID++; obj_valid = true; std::cout << "ctor(id=" << id << ")\n"; };
    ~Baz() { std::cout << "dtor(id=" << id << ")\n"; obj_valid = false; };
    
    //Baz(const Baz& b) { id = b.id; obj_valid = b.obj_valid; std::cout << "cctor(id=" << id << ")\n"; };
    Baz(Baz&& b) { id = std::move(b.id); obj_valid = std::move(b.obj_valid); b.id = -1; b.obj_valid = false; std::cout << "mctor(id=" << id << ")\n"; };
    
    Baz(const Baz& b) = delete;
    Baz& operator=(const Baz&) = delete;
    
    void f(const std::string& s) const { std::cout << "Baz::f(\"" << s << "\", id=" << id << ", obj_valid=" << obj_valid << ")\n"; }    
    
    static int ID;
    int id{-1};
    bool obj_valid{false};
};

int Baz::ID;


int main()
{
    EventManager eventMan;

    eventMan.AddClient([]{ std::cout << "lambda\n"; });
    eventMan.AddClient(std::bind([](int i){ std::cout << "lambda+bind\n"; }, 1234));
    
    std::function<void()> f1 = []{ std::cout << "std::function\n"; };
    eventMan.AddClient(f1);
    
    std::function<double(double)> f2 = [](double d){ std::cout << "std::function+bind\n"; return d;};
    eventMan.AddClient(std::bind(f2, .5));
    
    eventMan.AddClient(Foo());
    eventMan.AddClient(Bar());

    eventMan.AddClient(std::bind(&Baz::f, Baz(), "baz_t")); // ctor and move
    eventMan.AddClient(std::bind(&Baz::f, std::make_shared<Baz>(), "baz_p")); // same with shared_ptr

    {
        //Baz baz; // ctor
        //eventMan.AddClient(std::bind(&Baz::f, baz, "baz_o")); // copy ctor and move
    }
    
    {
        Baz baz;
        eventMan.AddClient(std::bind(&Baz::f, std::move(baz), "baz_m")); // invokes copy ctor
    }
    
    {
        Baz baz;
        eventMan.AddClient(std::bind(&Baz::f, std::ref(baz), "baz_r")); // no copy, goes out of scope, UB
    }
    
    eventMan.Emit();
}

Simple Hexo Recipes

Create new post

1
$> hexo new post <title>

Test content locally

Generate content into the public directory and start a local server.

1
$> hexo generate && hexo server

The server detects most modifications made to posts/themes and regenerates on the fly -> no restart necessary, just reload the page.

Deploying

There is no local master branch. All work is done inside the local source branch.
Test changes locally, commit and push them to upstream. Then deploy the generated content:

1
$> hexo generate && hexo deploy

This will push the generated content to the upstream master branch. The deployment process will push to the repository specified inside _config.yml. The repository URL may be SSH.

Build OpenTomb on Linux

A while ago the OpenTomb developers accepted my contribution that allowed the engine to be compiled under Linux.
This was not too hard, since the engine only depends on cross-platform libraries and uses GCC to compile on Windows. It mainly consisted of a CMake script and a few code fixes.
The CMake script already contains a very brief explanation on how to compile on the command-line.

This post provides a more detailed step-by-step guide to get everything up and running for development on Linux.

Tested with:

Requirements:

  • SDL2 installed (tested with 2.0.1)
  • zlib installed (tested with 1.2.8)
  • Mercurial installed (tested with 2.9)
  • CMake 2.8 installed (tested with 2.8.12)
  • QtCreator installed (tested with 3.0.1)
  • Game assets of TombRaider 1-5 (tested with GOG version)

Get the source code

Choose a directory and clone the OpenTomb source code repository:
hg clone http://hg.code.sf.net/p/opentomb/code opentomb-code

Compile using QtCreator

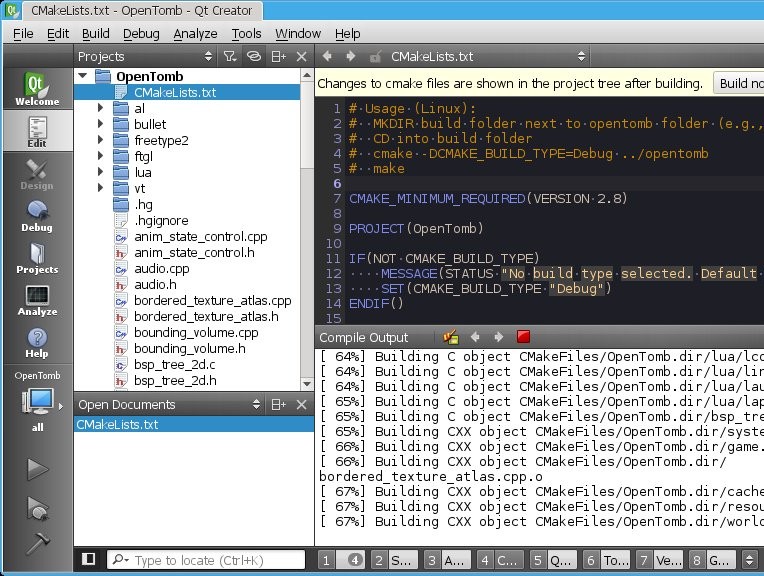
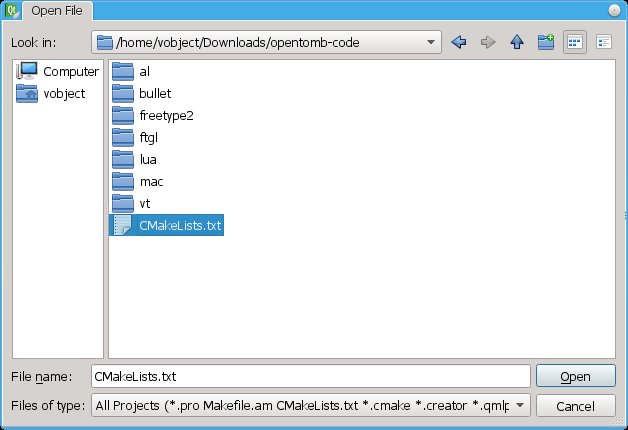
  1. Start up QtCreator and select File -> Open File or Project.
  2. Navigate to your cloned repository directory and open CMakeLists.txt.
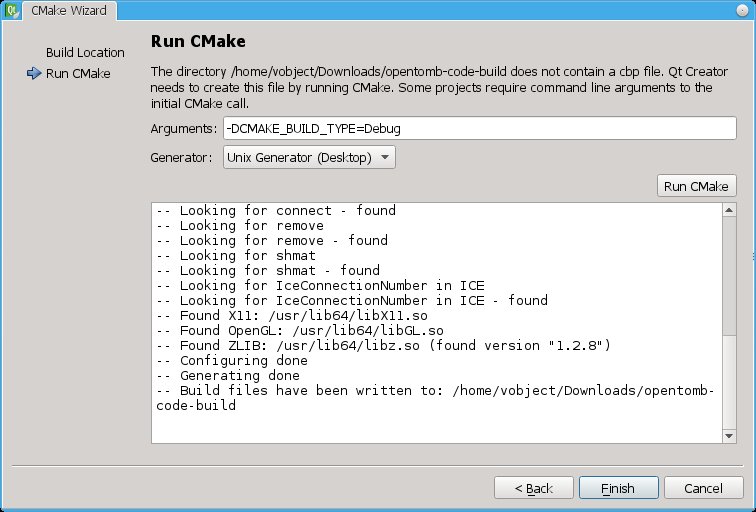
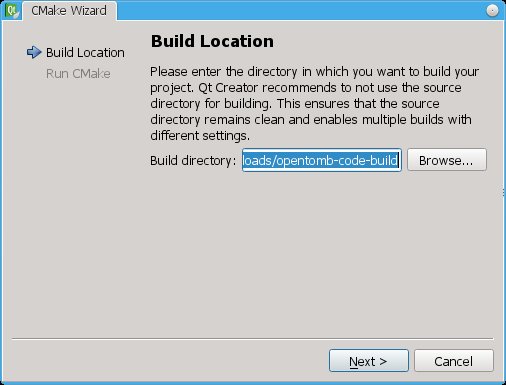
  1. Choose a build directory. Make sure it is located outside of the repository. The default build directory suggested by QtCreator (e.g. opentomb-code-build) is usually just fine.
  1. Provide CMake with the arguments -DCMAKE_BUILD_TYPE=Debug (if you plan to develop) or -DCMAKE_BUILD_TYPE=Release (if you just want to run the engine).
  2. Select Unix Generator as the generator and click Run CMake. This should successfully create a Makefile if the required libraries are installed. Click Finish.
  1. Hit Ctrl+B to start compilation. This can take a while to complete and creates the OpenTomb executable inside the build directory.

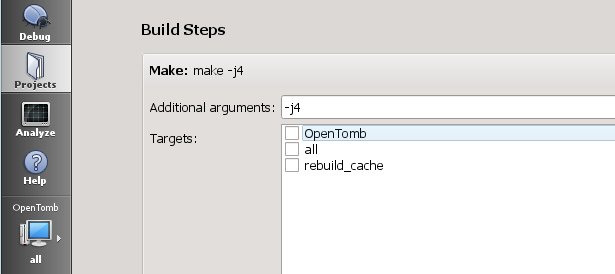
Pro tip: faster compilation

Add -j2 or -j4 (depending on how many CPU cores you have) into Projects -> Build & Run -> Build Steps -> Details -> Additional arguments.

Add config files

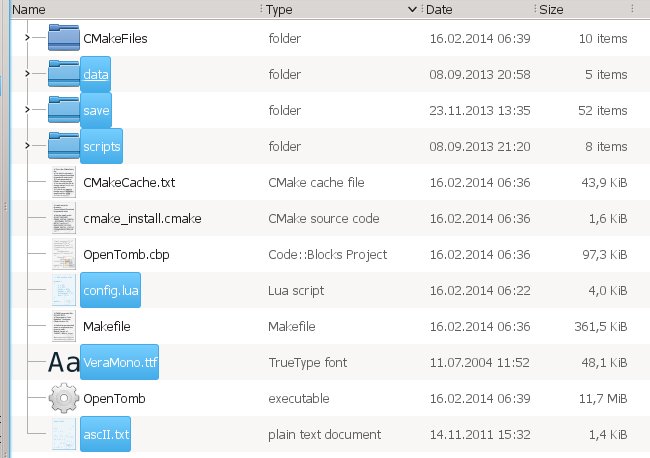
Extract the files form the OpenTomb binary archive (engine.7z) into the build directory. The important files/directories are: data, save, scripts, VeraMono.ttf, ascII.txt, config.lua.

Add game assets

Copy game files from the original Tomb Raider games into the corresponding data subdirectory like you would on Windows. E.g. copy all “*.TR2” levels from the Tomb Raider 2 data directory into opentomb-code-build/data/tr2/data.
To get audio, copy MAIN.SFX, too.

Final touch

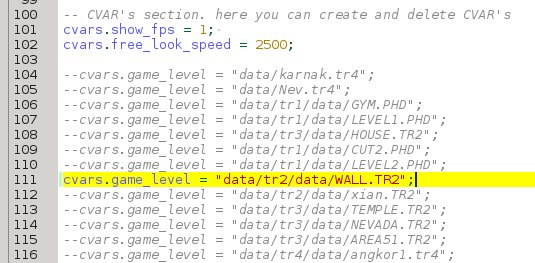
Modify cvars.game_level in config.lua to match an existing level file, e.g. data/tr2/data/WALL.TR2. Keep in mind, that file paths in Linux are case sensitive.

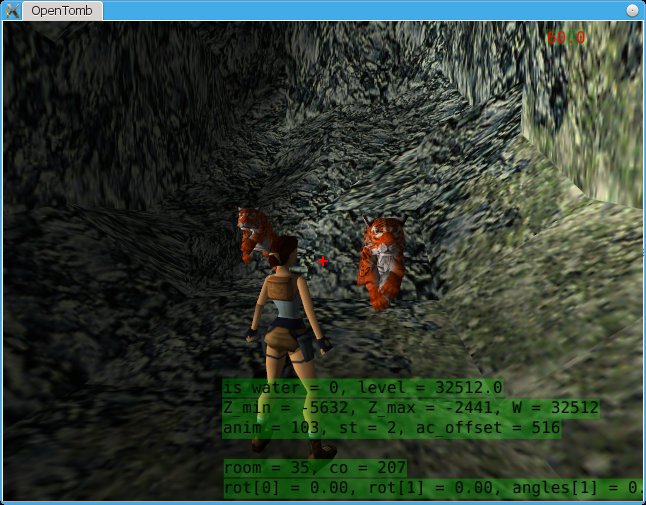
Now you should be able to launch the game using the file browser or from within QtCreator via Ctrl+R.

Build Stellarium on Windows

How to build Stellarium on Windows

Tested with:

  • Windows 7 32Bit
  • Windows 8 32Bit
  • the source tarball for Stellarium 0.12.0
  • the current Stellarium in-development branch 0.12.1

Requirements:

  • cygwin with bazaar package installed
  • no random crap inside the PATH variable that interferes with CMake, MinGW, Qt

MinGW (20120426):

Run the installer and select:

  • Pre-packaged repository catalogues (this will install gcc 4.6, while selecting Latest catalogue will install gcc 4.7 and the stellarium executable will crash at start)
  • C
  • C++
  • MSYS Basic System

Start MSYS Shell (MINGW_INSTALL\msys\1.0\msys.bat) and run:
mingw-get install libz libiconv gettext

Do not mind errors about already installed packages.

QT 4.8.4:

Install Qt into a path without spaces.
When asked by the installer point it to the previously installed MinGW directory.

CMake 2.8.10:

Install CMake. Do not add it to the PATH variable when asked for at the end of the installation.

Stellarium source code:

Create a folder stellarium. This is where we will put the source code, the build directory and QtCreator.

Start cygwin and go into the created folder. Fetch the latest source:
bzr branch lp:stellarium stellarium-lp

If the above command results in some sort of certificate error try this:
bzr branch -Ossl.ca_certs=/usr/ssl/certs/ca-bundle.crt lp:stellarium stellarium-lp

QtCreator 2.6.2:

Extract the archive into its own folder inside the stellarium directory next to stellarium-lp.
Inside stellarium folder create a new file qtcreator.bat with following content:

1
2
3
4
5
6
7
8
9
10
11
12
@echo off

set PATH=%PATH%;C:\MinGW_x86\bin
set PATH=%PATH%;C:\MinGW_x86\include
set PATH=%PATH%;C:\MinGW_x86\lib

set PATH=%PATH%;C:\Qt\4.8.4
set PATH=%PATH%;C:\Qt\4.8.4\bin
set PATH=%PATH%;C:\Qt\4.8.4\include
set PATH=%PATH%;C:\Qt\4.8.4\lib

start qt-creator\bin\qtcreator.exe

Change the paths accordingly.

Build:

Start qtcreator.bat.
Check if a MinGW Build Kit does exist: Tool -> Options -> Bild & Run -> Kits. Create a new one if it does not.

Open the Stellarium project using File -> Open File or Project and select stellarium-lp\CMakeLists.txt.
Go with the default build directory when asked for it (should end with stellarium-lp-build).
Specify the cmake executable if asked for it.
Select the MinGW Generator and Run CMake.

Compile.

Run:

To run from inside QtCreator change the working directory of the Run settings from stellarium-lp-build\src to the source folder stellarium-lp.

Run.

Debug:

The default CMake configuration of the stellarium source from launchpad is already set to Debug.

Hello World

Initial test post.

1
alert('Hello World!');
1
[rectangle setX: 10 y: 10 width: 20 height: 20];
Array.map
1
array.map(callback[, thisArg])
.compactUnderscore.js
1
2
.compact([0, 1, false, 2, '', 3]);
=> [1, 2, 3]
[title] [] [url] [link text]
1
2
for i in [1,2,3]:
    print(i)
[title] [url] [link text]
1
int i = 0;